


Business Development Manager
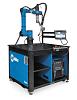
Here we see a 3.937 in./100 mm tall Wila TSU-030 extender in use.
Deep-box bending is not a complicated process, but managing it properly requires a lot of forethought with respect to your choice of press brake and tooling.
Think carefully about the type of work you are planning to do on a press brake before you make that purchase. If you plan to do deep-box bending, it’s important to choose a machine with ample open height. When you are forming a box, the final part is going to be in the press brake at a 45-degree angle when making the third and fourth bends. Therefore, you must plan for the fact that the sides of the boxes have to be able to swing up toward the press brake’s ram and not hit it or any clamping system that may be installed.
Tooling Height
This is why this type of bending requires very tall punches or a combination of punches and punch extenders. There are accurate ways of determining the correct height for the punch/extender combo. If you are using an American style press brake with the standard manual ram clamps, the formula I frequently use to estimate the punch height required is to multiply the depth of the box by 1.7. That will normally provide you with the punch height necessary to bend the part.
However, this formula doesn’t work in all cases. If you have a large-tonnage press brake with a wide ram or a heavy-duty clamping system because you are bending thicker materials such as ½-in. to 1-in. plate or thicker, or if you are bending high-strength steel and require a high-tonnage press brake with a heavy-duty clamping system that’s bigger and wider, the calculation is somewhat more complicated. The important point is that you have to make sure that not only do you have enough punch height to get down into the box, but also that the sides of the box are not going to hit your clamping system or ram if you are clamping your punches directly into the manual ram clamps that were provided with the press brake when they come up.
Die Variations
Once that part is formed around the punch, the punch is encased on all four sides and you have to be able to pull it off the tooling and out of the machine. To do this you need to be able to drop the part down and pull it away from the punch, which requires ample space between the punch and the die.
Standard die holders tend to be approximately 3 in. tall. However, if you want to regain some of that space to make it easier to remove parts from the punch once they’re formed, you can switch out the standard die holder for a much shorter one. These shorter die holders are something that most press brake builders and tooling manufacturers carry and something you should consider if you plan to produce deep boxes. As an example, if you use a die holder that is 1.378 in. (35 mm) tall when making this change in die holders, an additional 1.622 in. (41 mm) of working space is provided between the punch and die. This will make part manipulation during bending and extracting it from the machine when it is finished much easier.
Punch Length
Obviously, the punch to be used has to be able to cover the length of the bend (left to right). The most basic option for tooling is to purchase a single punch to do the job. However, that places severe limitations on the variety of parts that you will be able to form. This is because any time that you produce four-sided parts, you must have a punch that is the same length or slightly shorter than the length of the two longest bends. For this reason, you should select punches that provide the maximum flexibility, both in terms of the punch height and the use of sectionalized punches so that you can achieve virtually any length necessary.
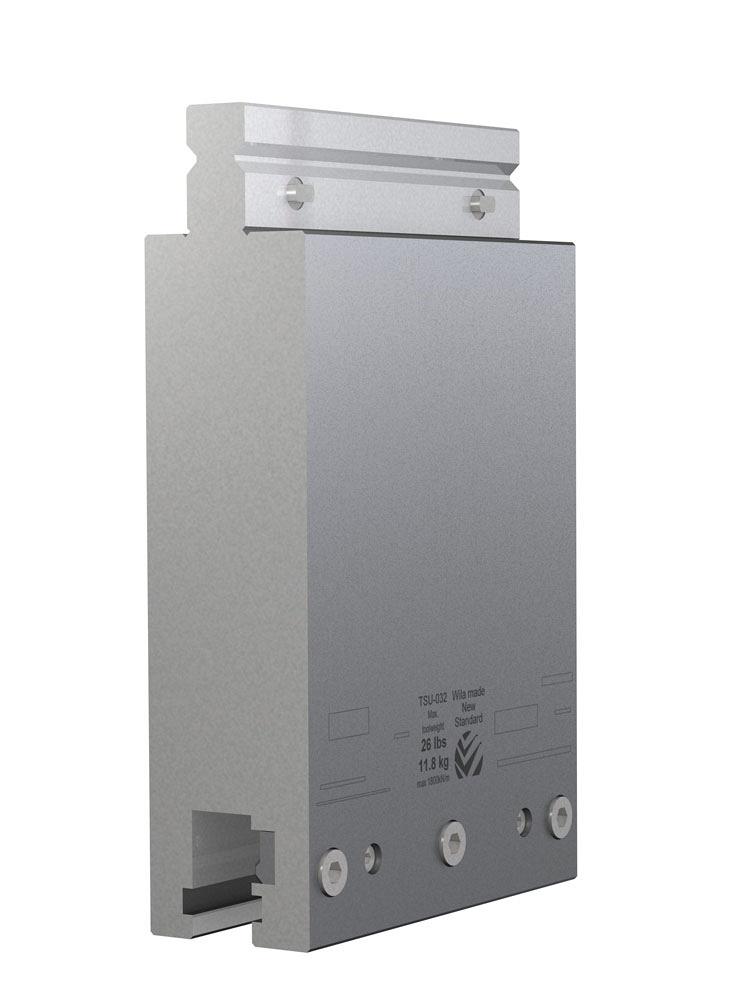
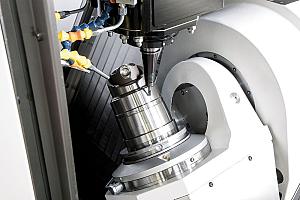
Extenders can add a substantial amount of working height to your break. This unit, for instance, adds 7.874 in./200 mm.
And this brings up an important point. Quite often people think that with sectionalized tooling they have to have the exact combination of individual sized pieces to achieve the desired bend length. I’m happy to report that’s really not true. If you are using precision-ground sectionalized tooling to bend mild steel, stainless steel, or even some high-strength steels, you can space these pieces out equally up to one material thickness and you won’t see any noticeable deformation at the bend line. Therefore, you don’t need a series of individual punch sections that collectively match the bend lengths precisely when bending a four-sided part. When bending softer materials like 5052-H32 aluminum, do not extend those spaces beyond 50 per cent of the material thickness.
Punch Profiles
Shops often use straight punches for deep-box bending, but this should be discouraged.
One concern with this choice of punch is that it offers no versatility. For instance, there is no relief area at the back of the punch for return flanges or anything else that might hit the punch. Instead, if you are buying a tool for deep-box bending – as long as you’re air bending, which is what most people are doing these days – get acute-angle punches because once you are done with the deep-box application, they can be used to bend a wide variety of parts, while producing just about any angle necessary. Acute punches are also frequently used in hemming applications.
Producing four-sided parts that have sides that are deeper than the width of the bottom of the part may require the use of a gooseneck punch that provides a larger relief area in which to project the flanges. When bending four-sided parts that have inside flanges at the top, it may be necessary to use a punch profile that is often referred to as a “sash punch.” In any of these cases, it is always a good idea to check the part against the punch profile to make sure that no collisions will occur before purchasing a punch. Your tooling supplier should be able to provide you with the proper recommendation.
If you are forced to bend material that isn’t consistent in thickness or hardness, or if there are grain direction issues and you have to bottom bend or coin the material to get high-quality, accurate bends, it may become necessary to use a 90-degree straight punch as it can withstand the higher tonnage requirements better.
Extender Choices
Extenders come in a variety of configurations with heights in Wila’s portfolio of products ranging between 3.937 in. (100 mm) and 7.874 in. (200 mm). Shorter lengths come with safety clicks for vertical loading and unloading, while other longer and heavier units are supplied with safety pins for horizontal loading and unloading. The shorter, lighter units can be loaded into the clamping system on the press brake with punch or punch sections already attached. Most Wila units also are capable of clamping, seating, centring, and aligning the punch sections as the clamp plate is tightened manually. This helps to compensate for some of the speed of setup that is lost when the punches are loaded into the extenders as opposed to being loaded into a hydraulic or pneumatic clamping system.
Wila also provides extenders that are available in lengths as long as the press brake that they are going to be used in. These extenders use manual ram clamps that are very similar to those that are provided with American style press brakes and are designed to hold long lengths of American style punches including long planer-made punches when necessary.
Die ProfilesMost press brakes are designed to achieve optimum performance when using dies with V-openings that are equal to eight times the material thickness. In the case of box bending, it is common for the fabricator to need a sharper inside bend radius than is generated by the recommended V-opening. When this is the case, you can often use a die with a V-opening of six times the material thickness when bending materials in the range of 12 ga. (0.105 in./2.7 mm) in thickness and thinner. Using a die with a V-opening of six times the material thickness to bend mild steel will generally provide an inside radius that is approximately equal to the material thickness. If the box has outside flanges around the top, it may also require a taller die as those flanges will become down flanges when the second bend is made on each side of the part.
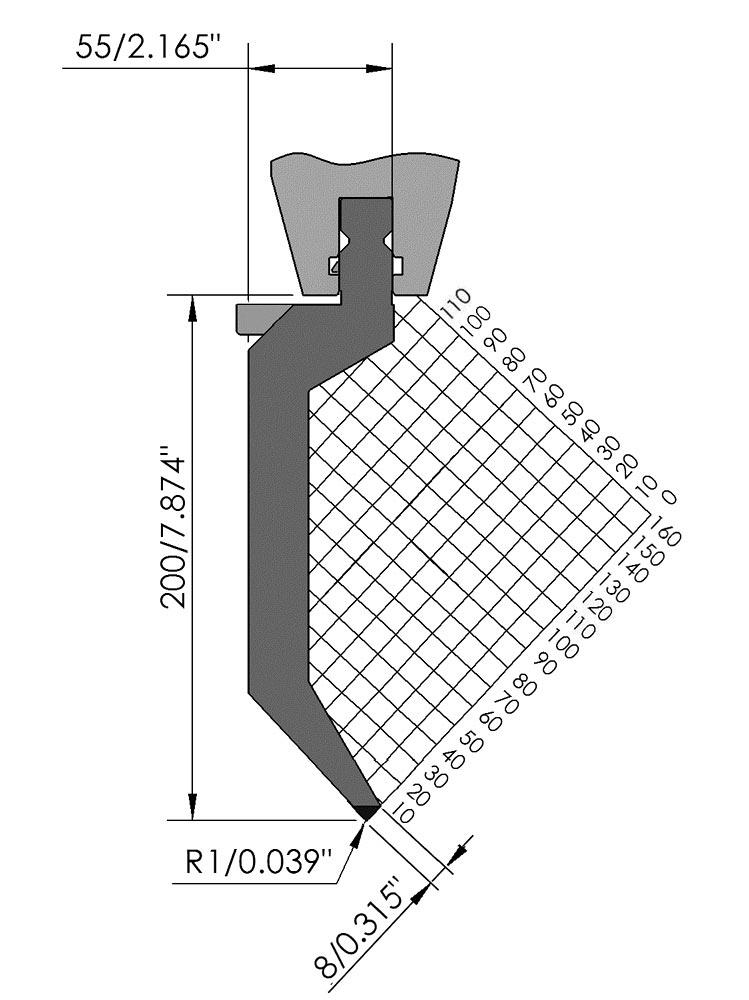
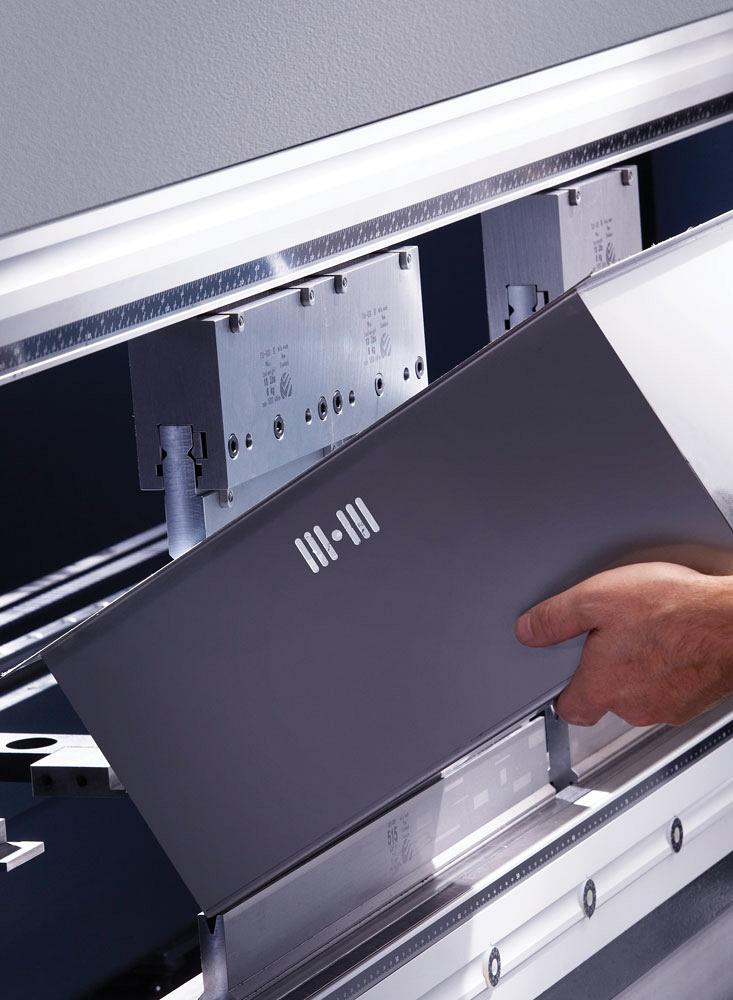
This is a 7.874 in./200 mm tool, which demonstrates the versatility one can find for deep box bending of lighter gauge materials.
Although deep-box bending is not complicated, proper planning is necessary to ensure the you have the right tools to do the job. When you need help to determine the overall best tooling, your press brake tooling supplier should be more than capable of recommending the most accurate, versatile, and productive tooling available.
David Bishop is business development manager, west, for Wila USA, 7380 Coca Cola Dr., Hanover, Md. 21076, 443-459-5496, www.wilausa.com. Images courtesy of Wila USA.


Keep up to date with the latest news, events, and technology for all things metal from our pair of monthly magazines written specifically for Canadian manufacturers!
Start Your Free Subscription
Easily access valuable industry resources now with full access to the digital edition of Canadian Metalworking.

Easily access valuable industry resources now with full access to the digital edition of Canadian Fabricating & Welding.