


Associate Editor

It is so important to use the proper tools when finishing stainless steel, especially because it is so expensive to work with.
It’s almost impossible to go anyplace where stainless steel is not visible. From the banks, airports, motels, restaurants and breweries, and elevators to common handrails, stainless steel is everywhere. Each stainless steel component was carefully crafted with both utilitarian and aesthetics functions in mind. Beyond fabricating and welding a product, metal finishers spend a great deal of time getting the sheets and finished products to look exactly the way a customer wants them.
With the multitude of finishes that can be produced, the experts agree that it is the No. 4 finish that is the most popular on the market today. It is truly the workhorse finish of finishes.
"The No. 4 finish is by far the most popular finish that shops produce and customers are asking for," said Steve Bell, Quebec territory manager, PFERD Canada Inc., Mississauga, Ont. "It was originally designed for the food industry as it does not leave pit marks where bacteria can collect. Instead it is an easy-to-clean surface. However, it also offers a very aesthetically pleasing grain finish, making it more common for other industries and projects."
And although the No. 4 finish is by far the most common, there are dozens of other finishes that customers may request for their products.
"Many other finishes have come out over the years," said Randy McDonald, applications specialist, Fein Canada, Mississauga, Ont. "The No. 4 finish has also been adapted to create a No. 4 family of finishes, which offer slight variations. Other commonly requested finishes include No. 6 and No. 7."
Providing the right finish to customers can be a challenge, though. One man’s No. 4 finish is not always another’s. Finishes are extremely subjective, and many shops may require extra fine-tuning to get the stainless steel to the exact requirements of the customer.
"I always tell people, the proper finish is a subjective opinion," said McDonald. "And by that I mean, I can go into a stainless steel shop that is producing No. 4-finish range hoods for restaurant equipment. I can show the shop a couple of wheels and the operator could look at the finish it produces and agree it’s perfect. However, I can go to the shop’s biggest competitor that is making the exact same product, using the same tool, the same wheels, and the operator could look at it and not think it is correct. That’s why it’s important to have a range of abrasives to account for the opinion factor, where shops can make the finish a little grainier or more satiny depending on customer needs."
Finishing can be time-consuming, and shops might have to take many different steps to get it right. It’s not an exact science, especially because of the human factor, both from the operator’s ability and the end user’s acceptance of the finish.
"It’s really important for each shop to ask questions to its customer about exactly what they are looking for in a finish," said Bell. "We often see shops spend extra time overfinishing a product, which can be unnecessary."
No. 2B—Standard mill finish, smooth grey reflective sheen from the factory. It is cold-rolled, heat-treated, and pickled with a skin pass. This is most widely used as a base material for most polished or brushed finish applications.

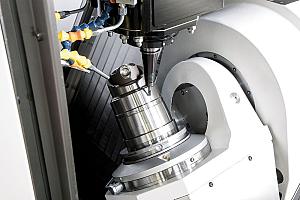
Because of all the different finishes and the incredibly wide range of abrasives available, a shop must have variable-speed tools and tools that provide the right speed range for the abrasives being used. Photo courtesy of Fein.
No. 4—Inline brushed finish, sometimes referred to as a food-grade finish. It is not reflective and can be in the 120- to 180-grit range, depending on the manufacturer. It is used extensively in food, dairy, pharmaceutical, and process equipment where a smooth sanitary finish is required.
No. 6—Inline satin brush finish, finer and softer than the No. 4 finish. This can be a subjective finish ranging from 320 to 600 grit, depending on the customer’s expectations.
No. 7 or 8—Mirror finish, absolutely no lines and very reflective with a high degree of clarity. It is obtained by using finer-grit abrasives in various steps and then with buffs and compounds. Typically used for architectural, ornamental, and mirror applications.
Working with stainless steel requires precision and skill. Some shops think they can just jump into fabricating stainless steel on a whim, whether that’s because they want to expand the business or because they’ve been asked to. Whatever the reason, shops need to seriously consider all the factors that go into working with stainless.
"You really have to be skilled," said McDonald. "It’s not like you can just take somebody in off the street, hand them a polishing tool, and expect good results. A welder or worker that is working with mild steel cannot be expected to be familiar with the intricacies of stainless. It’s different. It takes different machines and different equipment."
The experts agree that the first place to start is reaching out to well-known abrasives and finishing tool manufacturers. A representative can come into the shop to see what exactly the requirements are and help choose the right tools and process to get the job done right. They can also help train workers on the best system for finishing and abrasives. This can save an incredible amount of time and frustration.
When first starting out in stainless, it’s important to note that not all mills create finishes the same way. There is no one-size-fits-all mill-finished stainless steel.
"Each mill has its own particular process of obtaining their particular finish," said Bell. "When we talk of a No. 4 finish, the grit range can be anywhere from 120 to 320, depending on the project requirements. The higher the grit, the finer the lines and the more reflective the surface will be. If stock runs out or a shop is using material from two different mills, it may be required to refinish the surfaces to match. In order to do this, we recommend having multiple different tools and abrasives on hand to help get that nice matched result."
There are basically two types of finishes: rotational (created by an angle grinder pointed downward) and linear (created by peripheral grinding, producing a linear scratch pattern). Shops should start with a rotational finish to break down the weld and then move to a linear finish to get the finish just right.
"However, it’s really all about experimentation," said Bell. "It’s hard to give recommendations without seeing the workpiece. But the key to remember when finishing stainless is making the right choice on grits; too rough a grit creates deeper microgrooves in the surface, which will take more steps to remove. Another consideration is the type of abrasive grain. Each type of grain has its own characteristics with certain finishing advantages and disadvantages. Experimentation is a great opportunity to discover the look and finish that you can offer your customers. Testing different grits, in both coated and nonwoven products, will change the look and provide more options."
There is no one-size-fits-all finishing tool that a shop can use to magically achieve the required finish. With many different tools and steps needed, shops can become overwhelmed with choosing the right options. However, there are some recommendations that can help shops effectively finish.
"An absolute must for any shop is dedicated polishing/finishing tools with variable speed for stainless steel," said McDonald. "Because of all the different finishes and the incredibly wide range of abrasives available, a shop must have variable-speed tools and tools that provide the right speed range for the abrasives being used. This is the most critical choice when you are finishing, particularly from a safety standpoint. Tools with constant speed and constant torque work the best and provide the best finishes."
All finishing abrasives run at a much lower RPM than a grinding wheel, sanding disc, or flat disc. Standard grinders can run up to 10,000 RPM, whereas most finishing products need to be run around the 3,000-RPM range or lower. If a shop tries to use a fleece-type wheel on a grinder that’s running 10,000 RPM, it could blow up and seriously hurt somebody. It could also burn and discolour the material, causing warpage. Once this occurs, it is very hard to fix and most often the part will be scrapped.
"Finding the right tools, abrasives, conditioning discs, and finishing belts and drums depends on what the customer is looking for," said Bell. "Having a range of different grits and hand tools readily available can help a shop avoid any finishing issues. Even hand pads can be used at the final stage to help camouflage any finishing inconsistencies."
It is so important to use the proper tools when finishing stainless steel, especially because it is so expensive to work with.
"I do get into debates with people about the difference between electric tools and air tools," said McDonald. "The problem with air is that the speed of the tool is dependent on the air pressure supplied, which can be inconsistent. You don’t get the constant speed or constant torque needed. Whereas with electric tools, there are specific tools out there that have absolute constant speed and constant torque because they have a double-gear-reduction system. This is a must for proper finishing. It makes a huge difference. The right tool and right abrasives can all have an effect on the finish that you’re trying to produce or replicate."
Practice makes perfect. It may be difficult to practice in a demanding work environment, but it can also bring the best results and save the company a lot of time and money in the long term. Getting the proper training for employees can help minimize problems down the road. But sometimes challenges are unavoidable.
Keeping the stainless area or shop separate from other materials is essential. Shops don’t want to mix stainless with carbon steel and certainly don’t want the tools being used on both. Cross-contamination can cause rust on stainless. Having a dedicated area for finishing stainless that is contaminant-free and having dedicated tools can help start the process off right.
When working with stainless, shops can either purchase the stainless with the intended finish or they can purchase a less expensive finish and then finish it in shop. For example, it’s much less expensive to buy a No. 2B finish, cut and bend the material into the product, and then finish in shop. However, not all shops have the skill or experience to do this effectively, so they will purchase the stock in the appropriate finish.
"For example, you can purchase a No. 4 finish from the mill," said McDonald. "It will be more expensive, but it is a perfect No. 4 finish. There are a few things that shops are required to do in order to maintain the finish throughout the fabrication process. Mishandling of stainless steel, whether it is mill-finished or in-house-finished, is one of the biggest problems. If the material is not clamped properly, it can move and cause an inconsistent finish; if tools are left on the material, it could scratch the material. Keeping the work area clean and properly handling the workpiece are musts for properly finishing stainless."
It’s also important to note that many No. 4 mill-finish stainless steel sheets come with tape on them for protection. Some shops take this tape off when they go to work with the sheet. McDonald recommends keeping it on and removing only a small section at a time where finishing is required. Even when clamping, just a small area of tape needs to be removed; that way the operator only needs to clean up and finish that small area.
"Metal finishing is an art, and each metal finisher is an artist, so that’s why it’s so important to experiment," said Bell. "Just like a painter has his own palette of colours and tools that he uses, the same is true for each metal finisher. Getting the right finish can be challenging, and there are many things to consider. But practicing and following expert advice can help shops achieve proper finishing results."
Associate Editor Lindsay Luminoso can be reached at lluminoso@canadianfabweld.com.
Fein, fein.com
PFERD Canada, www.pferdcanada.ca


Keep up to date with the latest news, events, and technology for all things metal from our pair of monthly magazines written specifically for Canadian manufacturers!
Start Your Free Subscription
Easily access valuable industry resources now with full access to the digital edition of Canadian Metalworking.
Easily access valuable industry resources now with full access to the digital edition of Canadian Fabricating & Welding.